DIY Grill Gazebo: Transform Your Outdoor Cooking with This Incredible Project
Imagine stepping into your backyard on a sunny afternoon, ready to fire up the grill without worrying about sudden rain showers or harsh sun. This vision becomes reality with a DIY grill gazebo—a game-changing addition to any outdoor space that elevates your cooking experience from ordinary to extraordinary. A grill gazebo isn’t just about shelter; it’s about creating a dedicated zone for culinary adventures, where you can cook comfortably year-round while adding significant value and style to your home.
Many homeowners dream of perfect outdoor entertaining areas but assume custom structures require professional installation and hefty budgets. The truth is, building your own grill gazebo is more accessible than you might think. With careful planning, basic tools, and some weekend dedication, you can construct a beautiful, functional space that protects your investment in quality grilling equipment. This project allows you to customize every detail to match your backyard's aesthetic while ensuring optimal functionality for your cooking needs.
Beyond practical protection, a DIY grill gazebo creates a focal point for gatherings. It transforms your grill from a standalone appliance into the centerpiece of your outdoor living area. Whether you're hosting summer barbecues, preparing family dinners, or enjoying quiet evenings cooking under the stars, this structure enhances every experience. The satisfaction of cooking in a space you built yourself adds an extra layer of enjoyment to every meal prepared there. Let's explore how you can bring this rewarding project to life in your own backyard.
Planning Your Perfect DIY Grill Gazebo
Before picking up any tools, thoughtful planning ensures your DIY grill gazebo project succeeds. Start by assessing your outdoor space. Measure the area where you'll build, considering both the gazebo's footprint and surrounding clearance. Your grill needs at least three feet of clearance from any combustible materials, so factor this into your dimensions. Consider the gazebo's orientation—position it to maximize shade during peak cooking hours while minimizing wind exposure that could affect grill performance.
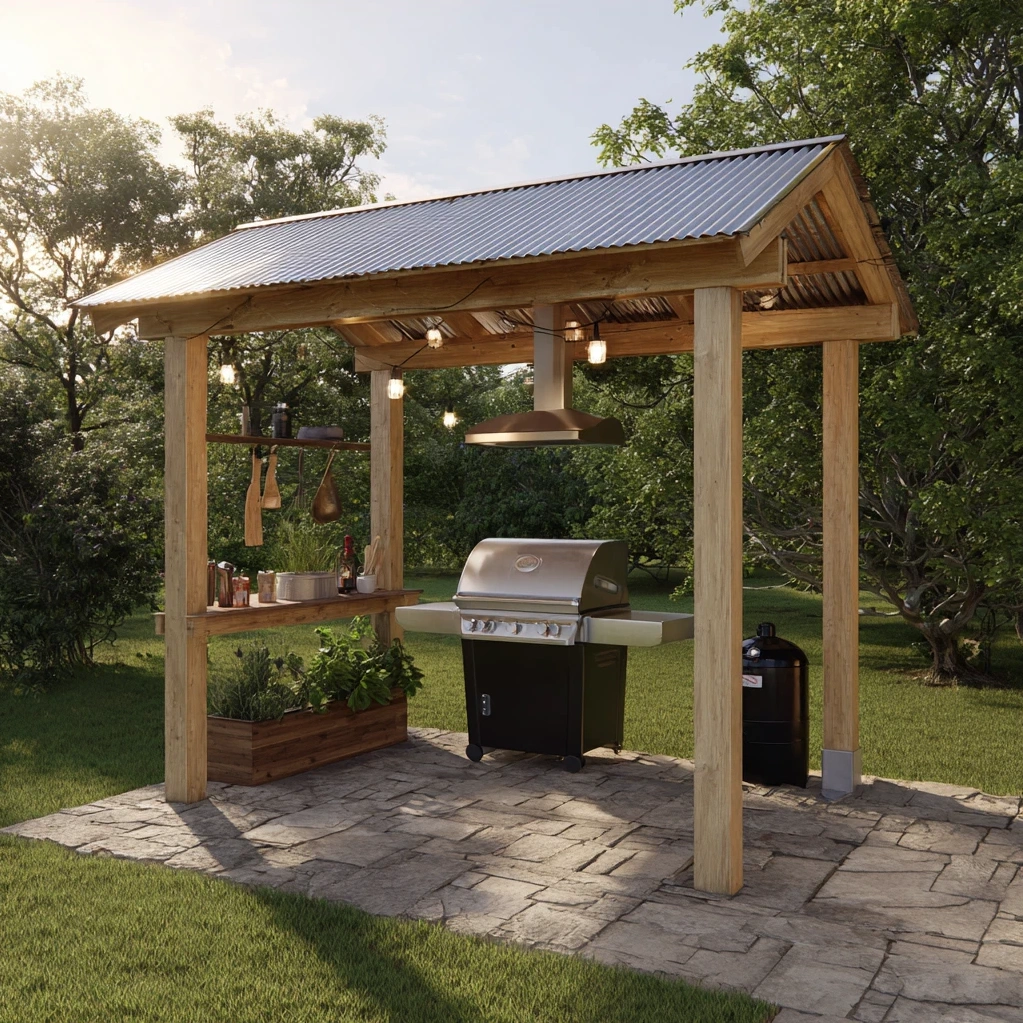
Next, determine your design style. Do you prefer a rustic wooden structure, a modern metal frame, or a classic pergola-style gazebo? Your choice influences material selection and construction complexity. Sketch your design with measurements, including roof pitch, post placement, and height. Remember to plan for utilities if you'll incorporate lighting, electrical outlets for grill accessories, or plumbing for outdoor sinks. Check local building codes—some areas require permits for permanent structures, especially those over certain sizes or attached to your home.
Material selection makes or breaks your project. For the frame, pressure-treated lumber offers durability against weather, while cedar or redwood provides natural resistance to insects and decay. Metal frames require welding skills but offer sleek modern aesthetics. Choose roofing materials that complement your home—corrugated metal sheds rain efficiently, while polycarbonate panels let in light while providing shelter. Don't forget hardware: stainless steel screws and brackets resist rust better than standard options. Create a detailed shopping list with quantities to avoid mid-project delays. Proper planning transforms a daunting project into manageable steps with clear direction.
Essential Steps for Building Your DIY Grill Gazebo
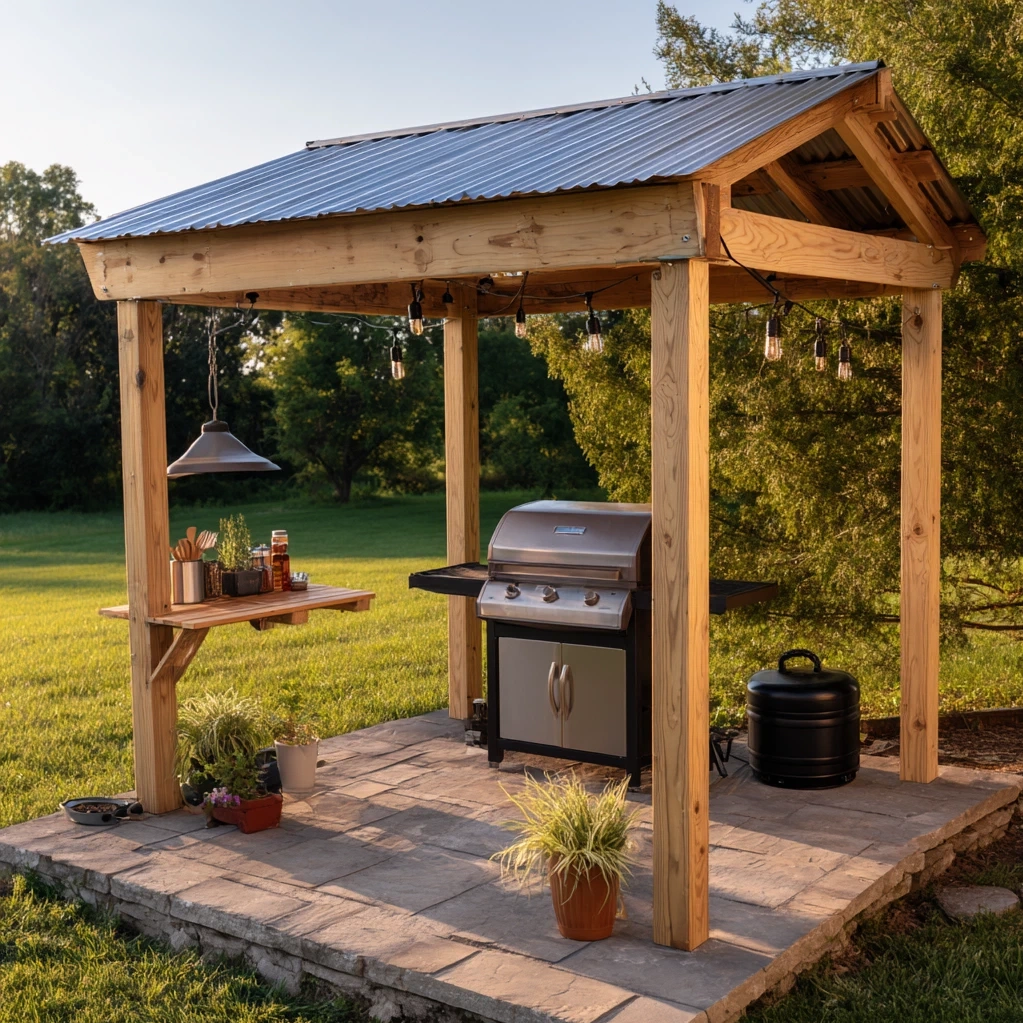
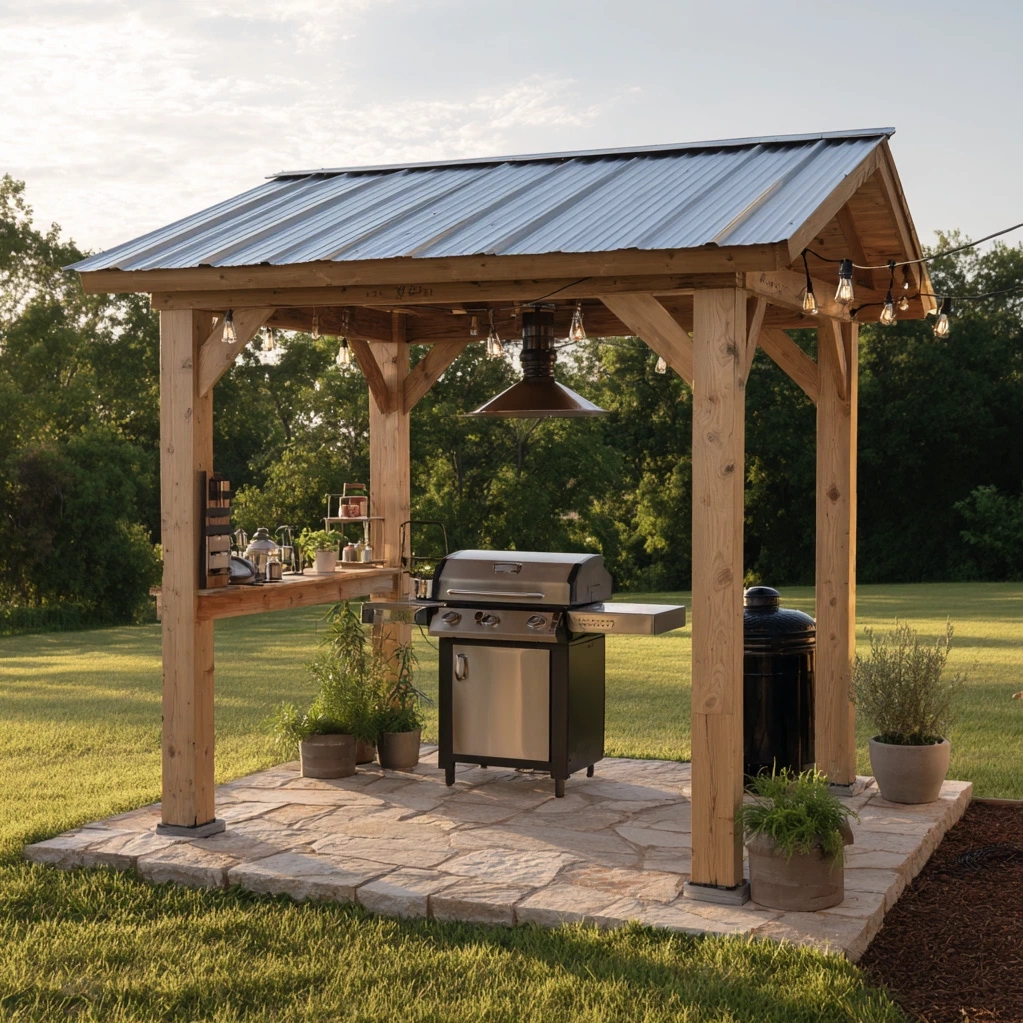
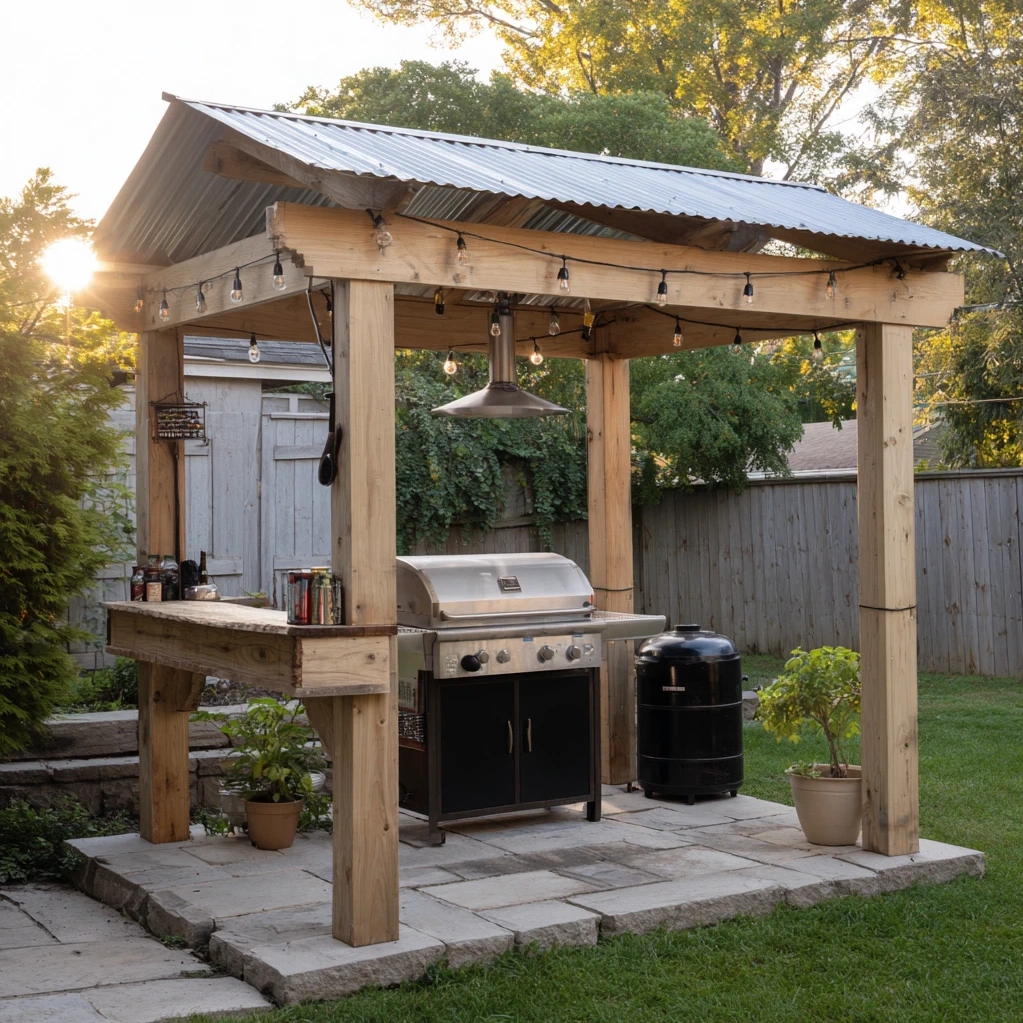
With plans finalized, construction begins with site preparation. Clear the area of debris and level the ground. For permanent structures, dig post holes at least 24 inches deep (deeper in frost-prone regions) and set posts in concrete for stability. Use a level constantly—crooked posts compromise the entire structure. Once posts are set and concrete cured, attach beams and rafters according to your design. This framework forms the skeleton of your DIY grill gazebo and must be square and secure.
Roof installation comes next. If using shingles or metal panels, install sheathing first. For open designs, space rafters evenly and secure roofing material directly to them. Ensure proper overhang to direct water away from the cooking area. Consider adding gutters if rainfall is heavy in your region. Next, add any side features—lattice for partial enclosure, shelves for utensil storage, or hooks for grill tools. These functional elements maximize your gazebo's utility beyond mere shelter.
Finish with details that enhance both aesthetics and safety. Apply weather-resistant stain or paint to wood surfaces. Install lighting under the roof for evening cooking—LED strips or waterproof fixtures work well. Consider a fire-resistant mat beneath your grill for added protection. Finally, arrange your cooking zone logically: keep fuel sources away from heat, create prep surfaces at comfortable heights, and ensure good ventilation. Building a DIY grill gazebo requires patience but rewards you with a custom outdoor kitchen that reflects your personal style and meets your specific cooking needs.
Creative Enhancements for Your DIY Grill Gazebo
Once your basic structure stands, personalize it with enhancements that boost functionality and style. Storage solutions keep your grilling area organized. Install shelves or cabinets for spices, tools, and grill accessories. Use hooks for hanging utensils and potholders within easy reach. Consider a dedicated counter space for food prep—stainless steel surfaces clean easily, while butcher block adds warmth. These additions transform your DIY grill gazebo from simple shelter to a fully equipped outdoor kitchen.
Lighting creates ambiance and extends usability into evening hours. String lights along rafters provide soft illumination, while task lighting above prep areas ensures safety during food preparation. Solar-powered options eliminate wiring hassles. For climate control, add retractable side curtains or install a ceiling fan to circulate air on hot days. In cooler months, incorporate outdoor-rated heaters to make the space comfortable year-round. These features make your gazebo usable in various weather conditions, maximizing your investment.
Don't overlook decorative elements that reflect your personality. Climbing plants like ivy or jasmine soften the structure's edges. Colorful outdoor cushions on built-in seating create inviting spaces for guests. Incorporate your grill gazebo into larger landscaping by adding stone pathways or bordering it with drought-resistant plants. Personal touches—custom signage, unique hardware, or repurposed materials—make the space uniquely yours. Remember, enhancements should complement rather than complicate the primary function: creating an ideal environment for outdoor cooking and entertaining.
Conclusion
Building a DIY grill gazebo represents more than just a weekend project—it's an investment in your home's functionality, value, and your family's quality of life. This structure transforms ordinary grilling into an elevated experience, providing shelter, organization, and style to your outdoor cooking space. The process teaches valuable skills while yielding tangible results you'll enjoy for years. Each meal prepared under your custom-built shelter carries the satisfaction of creation, from the structure itself to the food cooked within it.
Looking forward, your grill gazebo can evolve with your needs. As your outdoor entertaining grows, you might add adjacent features like dining areas, fire pits, or outdoor bars that complement your cooking zone. The skills you've developed building this structure empower you to tackle other backyard improvements with confidence. Regular maintenance—annual inspections, re-sealing wood surfaces, checking hardware—ensures your gazebo remains beautiful and functional through changing seasons.
Most importantly, this project creates lasting memories. From the first sketch to the final decorative touch, you've crafted not just a structure but a destination for connection. Whether hosting lively gatherings or enjoying quiet family dinners, your DIY grill gazebo becomes the heart of outdoor living. Start planning today—measure your space, gather inspiration, and take that first step toward creating the outdoor cooking oasis you've imagined. Your next barbecue awaits in a space uniquely yours, built with your own hands and vision for perfect outdoor living.
Frequently Asked Questions
Q: What basic tools do I need to build a DIY grill gazebo?
Essential tools include a measuring tape, level, circular saw or handsaw, drill with bits, hammer, wrench set, ladder, and safety gear (glasses, gloves). For site preparation, you'll need a shovel and post hole digger. If working with concrete, a mixing tub or wheelbarrow helps. Advanced tools like a miter saw or nail gun speed up the process but aren't mandatory. Rent specialized tools if needed rather than purchasing for one-time use. Always prioritize tools that ensure accurate measurements and secure fastening for a stable structure.
Q: How much does it typically cost to build a grill gazebo?
Costs vary widely based on size, materials, and features. A basic 8×8-foot wooden gazebo using pressure-treated lumber might cost $500-$800 for materials. Upgrading to cedar or adding metal roofing increases this to $1,000-$1,500. Larger structures or those with electrical wiring, custom finishes, or built-in features can reach $2,000-$3,000. Budget extra for unexpected expenses like additional hardware or tools. Compared to pre-made options costing $2,000-$5,000+, DIY projects offer significant savings while allowing complete customization. Remember that quality materials justify higher initial costs through longer lifespan.
Q: How do I protect my grill gazebo from weather damage?
Start with weather-resistant materials: pressure-treated or naturally durable woods, stainless steel hardware, and waterproof roofing. Apply high-quality outdoor sealant or stain annually to wooden surfaces. Ensure proper roof pitch and overhangs to direct water away from the structure. In windy areas, secure the gazebo with additional anchoring. Clear snow accumulation promptly in winter to prevent roof damage. Regular maintenance—checking for loose fasteners, replacing worn components, and cleaning surfaces—prevents small issues from becoming major repairs. Consider retractable side panels for added protection during storms while maintaining open-air design in fair weather.