
DIY Window Awning: Transform Your Home with Stunning, Practical Shade
Imagine stepping into a sun-drenched room on a summer afternoon, only to find it pleasantly cool and protected from harsh glare. This isn’t a luxury reserved for expensive renovations—it’s achievable through a DIY window awning project that marries style with function. Window awnings are more than just decorative additions; they are practical solutions that enhance your living space in multiple ways. By installing awnings, you can significantly reduce indoor temperatures, protect your furniture from UV damage, and lower energy costs by minimizing air conditioning use. Beyond the practical benefits, a well-designed awning adds architectural interest and curb appeal to your home, creating inviting outdoor spaces perfect for relaxation or entertaining. The beauty of tackling this as a DIY project lies in the customization it allows. You can choose materials, colors, and designs that perfectly match your home’s aesthetic, all while working within your budget. Whether you’re looking to create a cozy nook by a bay window or shield a patio door from relentless sun, a DIY window awning offers a rewarding and impactful home improvement. This guide will walk you through everything from planning to installation, empowering you to transform your windows with confidence and creativity. Embrace the opportunity to enhance both your home’s comfort and its visual appeal with this accessible project.
Planning Your DIY Window Awning: Essential Steps for Success
Before you pick up a single tool, thorough planning is crucial for a successful DIY window awning. Start by measuring your window accurately—note the width, height, and any architectural features like trim or sills. Consider the awning's purpose: is it primarily for shade, weather protection, or aesthetic enhancement? This will influence the design and materials. Next, research local building codes and homeowners association rules, as some areas have restrictions on exterior modifications. Choose a location that maximizes functionality; for sun protection, position the awning on the south or west side of your home. Decide on the style: traditional stationary awnings offer permanent coverage, while retractable options provide flexibility. Select materials wisely; canvas and acrylic fabrics are popular for their durability and color options, while aluminum or wood frames offer sturdy support. Create a detailed materials list and budget, factoring in tools you may need to purchase or rent. Sketch your design, including dimensions and attachment points. Proper planning ensures your DIY window awning not only looks great but also withstands weather and time. Take your time with this phase—it's the foundation of a project you'll enjoy for years.
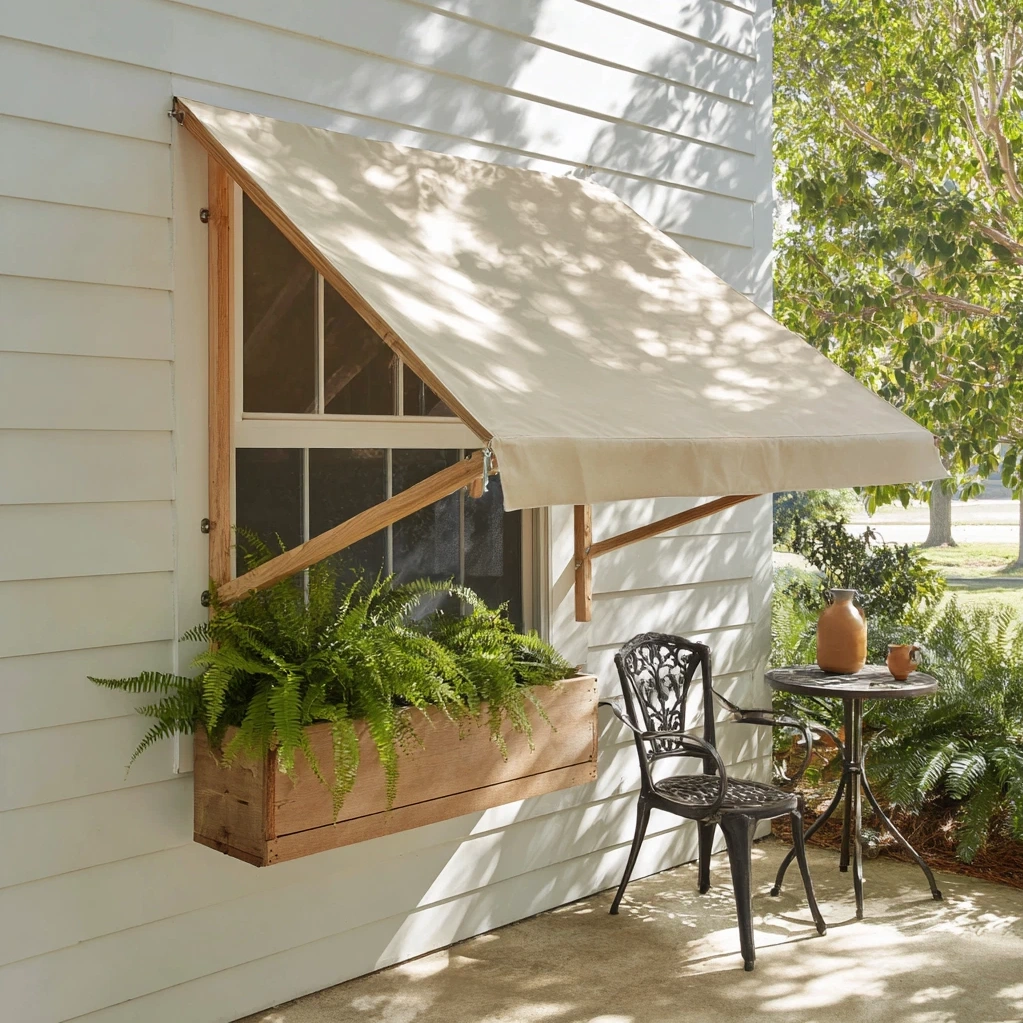
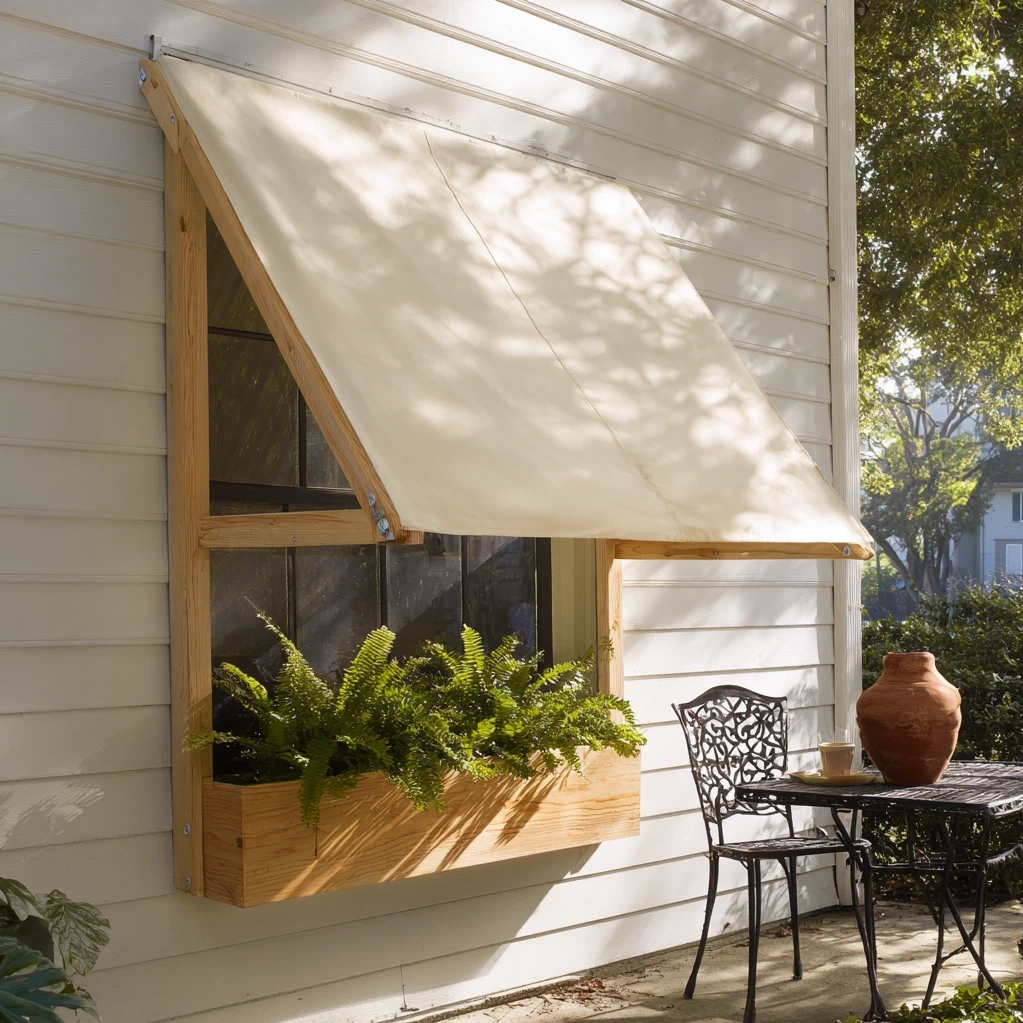
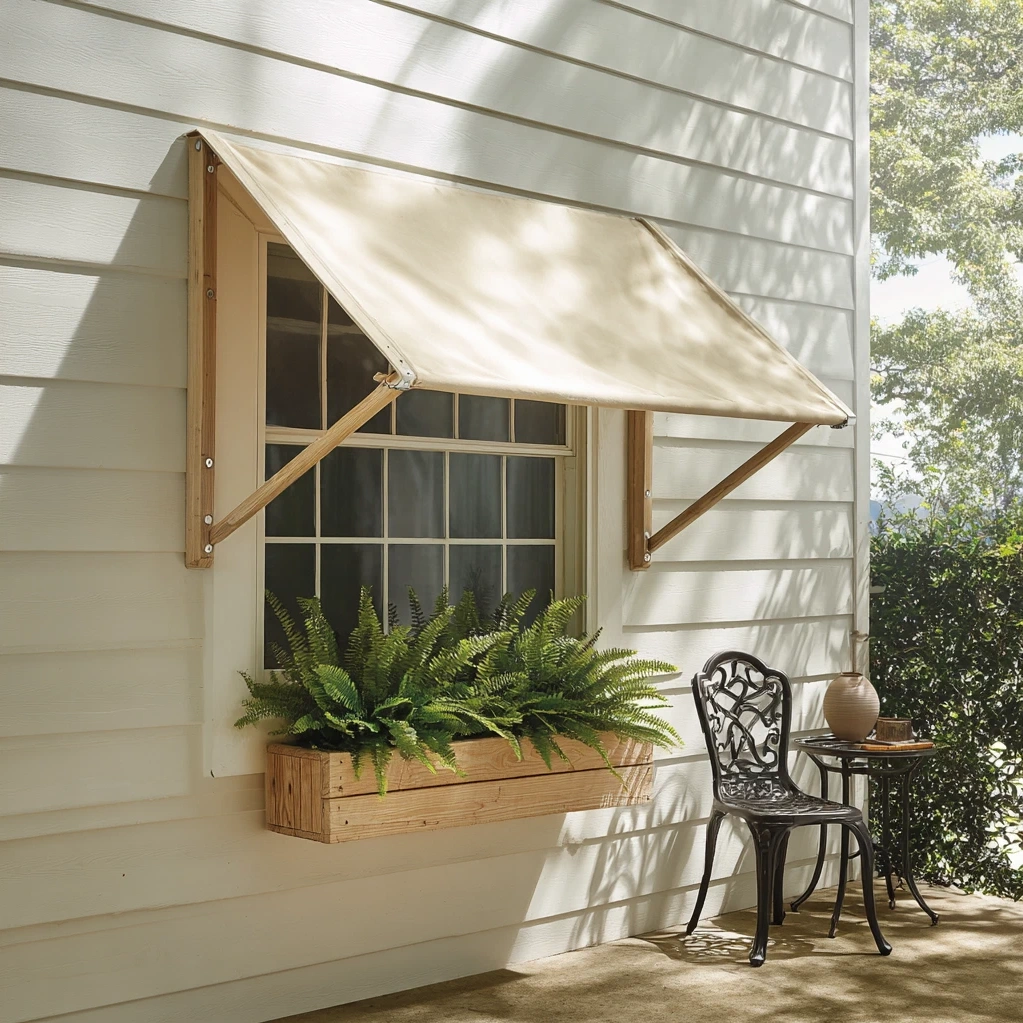
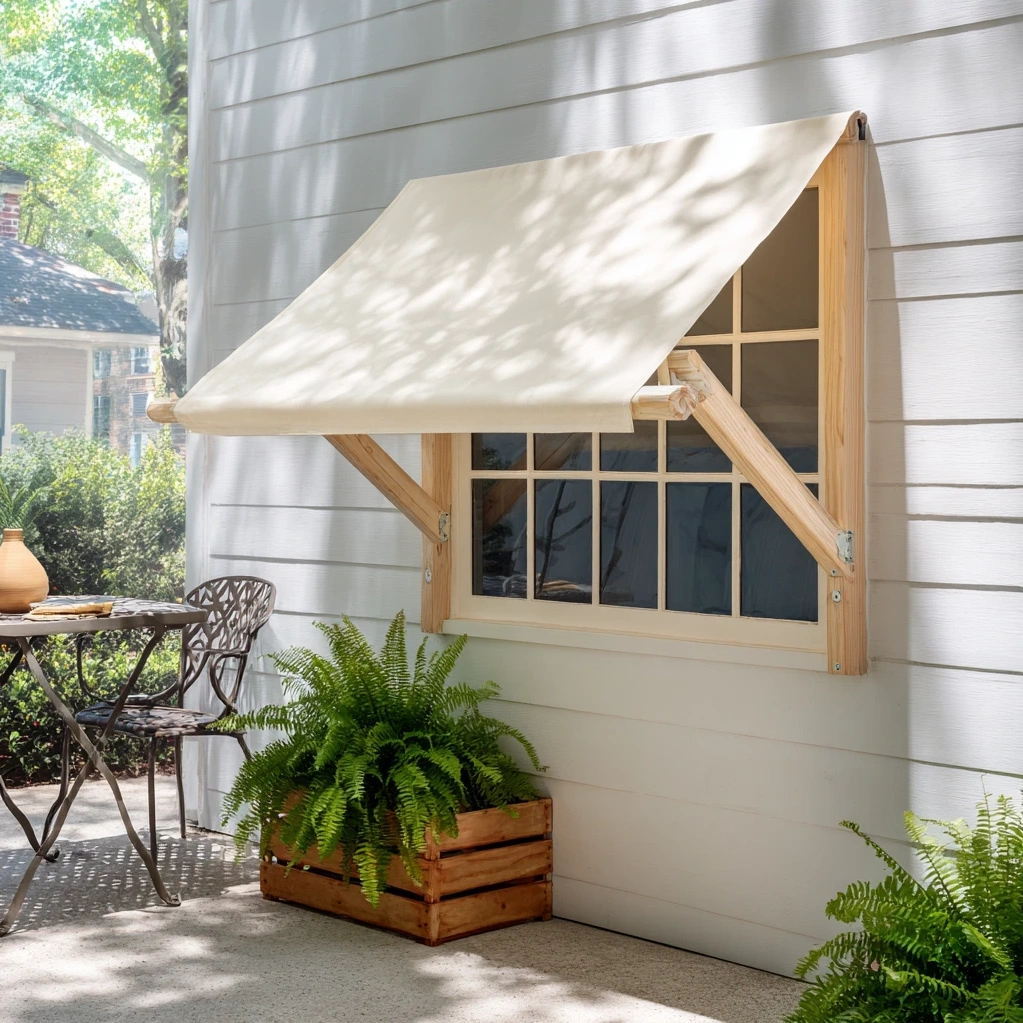
Building a DIY Window Awning: Materials and Construction Tips
Once your plan is in place, it's time to gather materials and begin construction. For a basic stationary awning, you'll need framing lumber or metal brackets, fabric or polycarbonate panels, screws, anchors, and waterproof sealant. Start by constructing the frame; cut your lumber to size, ensuring all joints are square for stability. Assemble the frame using galvanized screws or bolts, reinforcing corners with metal brackets if needed. If using metal, weld or bolt components securely. Next, prepare the covering material; measure and cut fabric or panels to fit the frame, leaving a slight overhang for water runoff. Attach the covering using staples, screws, or adhesive strips designed for outdoor use—ensure it's taut to prevent sagging. Pre-drill holes in the frame for mounting, and mark corresponding spots on your home's exterior. Use a level to align the awning perfectly before securing it with heavy-duty anchors into studs or masonry. Apply waterproof sealant around all seams and attachment points to prevent leaks. For added durability, consider treating wood with weather-resistant stain or paint. Test the awning's stability by applying gentle pressure. Remember, safety first: wear protective gear and work with a partner when lifting heavy components. This hands-on process not only saves money but also gives you pride in a custom-built feature.
Design Ideas for Your DIY Window Awning: Style Meets Function
Your DIY window awning should reflect your personal style while serving its practical purpose. For a classic look, opt for a striped canvas awning with a curved valance—it evokes a timeless, cottage-inspired charm. Modern homes might benefit from a sleek, angular design with metal framing and neutral-colored polycarbonate panels. Consider incorporating decorative elements like scalloped edges or contrasting piping for visual interest. Color choice is key; lighter shades reflect heat, while darker tones can create a cozy ambiance. If you have multiple windows, coordinate awnings for a unified appearance, but vary sizes based on each window's exposure. For functionality, think beyond basic shading: add side panels to block wind or integrate lighting for evening use. Retractable awnings offer versatility, allowing you to adjust coverage based on weather. In gardens, match the awning to surrounding plants or outdoor furniture for a cohesive look. Don't forget small details—choose hardware that complements your home's finish, and add finials or end caps for a polished touch. Sketch different options and visualize how they'll enhance your home's architecture. A well-designed DIY window awning not only protects but also elevates your home's character, making it a standout feature in your neighborhood.
Maintaining Your DIY Window Awning for Longevity and Beauty
To ensure your DIY window awning remains functional and attractive for years, regular maintenance is essential. Start with a seasonal cleaning routine; use a soft brush or cloth to remove dirt, leaves, and debris from the fabric or panels. For fabric awnings, mix mild soap with water and gently scrub, then rinse thoroughly to prevent mold or mildew. Avoid harsh chemicals that could damage materials. Inspect the frame and hardware periodically for signs of rust, corrosion, or loose screws—tighten or replace as needed. Before winter, consider removing retractable awnings or securing stationary ones against snow load. Check for water pooling; adjust the angle slightly if necessary to improve drainage. Reapply waterproof sealant annually around attachments and seams to prevent leaks. For wood frames, touch up paint or stain every few years to protect against weathering. If you notice fabric fading or tears, repair promptly with patches or professional services to extend its life. Keep an eye on surrounding trees or structures that might impact the awning's stability. By dedicating a few hours each season to upkeep, you'll preserve both the appearance and durability of your DIY window awning. This proactive approach saves money on repairs and ensures your investment continues to enhance your home comfortably.
Conclusion
Embarking on a DIY window awning project is more than just a home improvement task—it's an opportunity to creatively enhance your living space while reaping practical benefits. From the initial planning stages to the final touches of maintenance, each step allows you to tailor the awning to your specific needs and style preferences. By following the guidelines outlined in this article, you can successfully build a structure that provides shade, reduces energy costs, and adds visual appeal to your home. Remember, the key to a great DIY window awning lies in careful measurement, quality materials, and consistent upkeep. As you enjoy the cooler indoor temperatures and the inviting outdoor nooks created by your awning, consider how this project might inspire further enhancements. Perhaps you'll add matching awnings to other windows, integrate planters, or explore automated retractable systems. The skills you've gained can also be applied to other outdoor projects, like pergolas or shade sails. Looking ahead, as climate considerations become increasingly important, awnings offer an eco-friendly way to manage sunlight and heat. Share your experience with friends or neighbors—you might spark a community of DIY enthusiasts. Ultimately, your DIY window awning stands as a testament to your craftsmanship and vision, transforming everyday spaces into havens of comfort and style.
Frequently Asked Questions
Q: What materials are best for a DIY window awning in rainy climates?
In rainy climates, choose waterproof and mildew-resistant materials for durability. For the frame, pressure-treated wood, aluminum, or powder-coated steel are excellent options as they resist rust and decay. For the covering, acrylic or polyester fabrics with waterproof coatings are ideal—they shed water effectively and dry quickly. Polycarbonate panels also work well, providing clear coverage while being impact-resistant. Ensure all seams are sealed with waterproof adhesive or stitching, and install the awning with a slight pitch (about 1 inch per foot) to promote water runoff. Regular maintenance, such as cleaning debris and reapplying sealant, will further protect your awning from moisture damage.
Q: Can I install a DIY window awning on a brick or stucco exterior?
Yes, you can install a DIY window awning on brick or stucco exteriors, but it requires specific tools and techniques for a secure attachment. For brick, use masonry anchors or sleeve anchors designed to grip into the mortar or brick itself. Pre-drill holes with a hammer drill and carbide bit to avoid cracking. For stucco, locate the wooden studs behind the surface using a stud finder, then drill through the stucco into the studs for anchoring. Always use corrosion-resistant screws and washers to prevent rust stains. It's advisable to consult local building codes or a professional if unsure about load-bearing requirements. Proper installation ensures your awning stays firmly in place, even in windy conditions.
Q: How much can I expect to save by building a DIY window awning versus hiring a professional?
Building a DIY window awning can save you 50% to 70% compared to hiring a professional, depending on materials and complexity. On average, professional installation costs between $500 and $2,000 per awning, while a DIY project might range from $100 to $600 for materials. For example, a simple canvas awning with a wood frame could cost around $150 in materials, whereas a retractable metal awning might be closer to $500. Savings come from eliminating labor costs and markup on materials. However, factor in tool rentals or purchases if needed. DIY also allows for customization without upcharges. Keep in mind that professional services offer warranties and expertise, so weigh the trade-offs based on your skill level and project scope.
