DIY Mud Kitchen: Transform Your Backyard with This Amazing Creative Project
Imagine a backyard where children’s laughter mixes with the earthy scent of fresh soil, where creativity flows as freely as the water from an old faucet, and where simple play becomes a gateway to learning and connection. This is the magic of a DIY mud kitchen—an outdoor playspace that transforms ordinary backyard time into extraordinary childhood memories. More than just a play area, a mud kitchen represents a beautiful intersection of imagination, hands-on learning, and sustainable creativity that benefits both children and parents.
In today's digital age, where screens often dominate playtime, a DIY mud kitchen offers a refreshing alternative that engages all the senses. Children learn through tactile exploration, developing fine motor skills as they mix, pour, and create imaginary meals from nature's simplest ingredients. Parents appreciate the educational value—this is STEM learning in its most natural form, teaching concepts of measurement, texture, and basic physics through play. The benefits extend beyond education to emotional development, as mud kitchens encourage cooperative play, problem-solving, and self-expression in an unstructured environment.
Building a DIY mud kitchen also represents a sustainable approach to play. By repurposing old furniture, kitchenware, and natural materials, you create something meaningful while reducing waste. The project encourages outdoor exploration and connection with nature, helping children develop appreciation for the environment. Whether you're a crafty parent looking for a weekend project or someone seeking to create engaging outdoor space for your children, this guide will show you how to create the perfect DIY mud kitchen that will become the heart of your backyard play.
Essential Materials for Your DIY Mud Kitchen
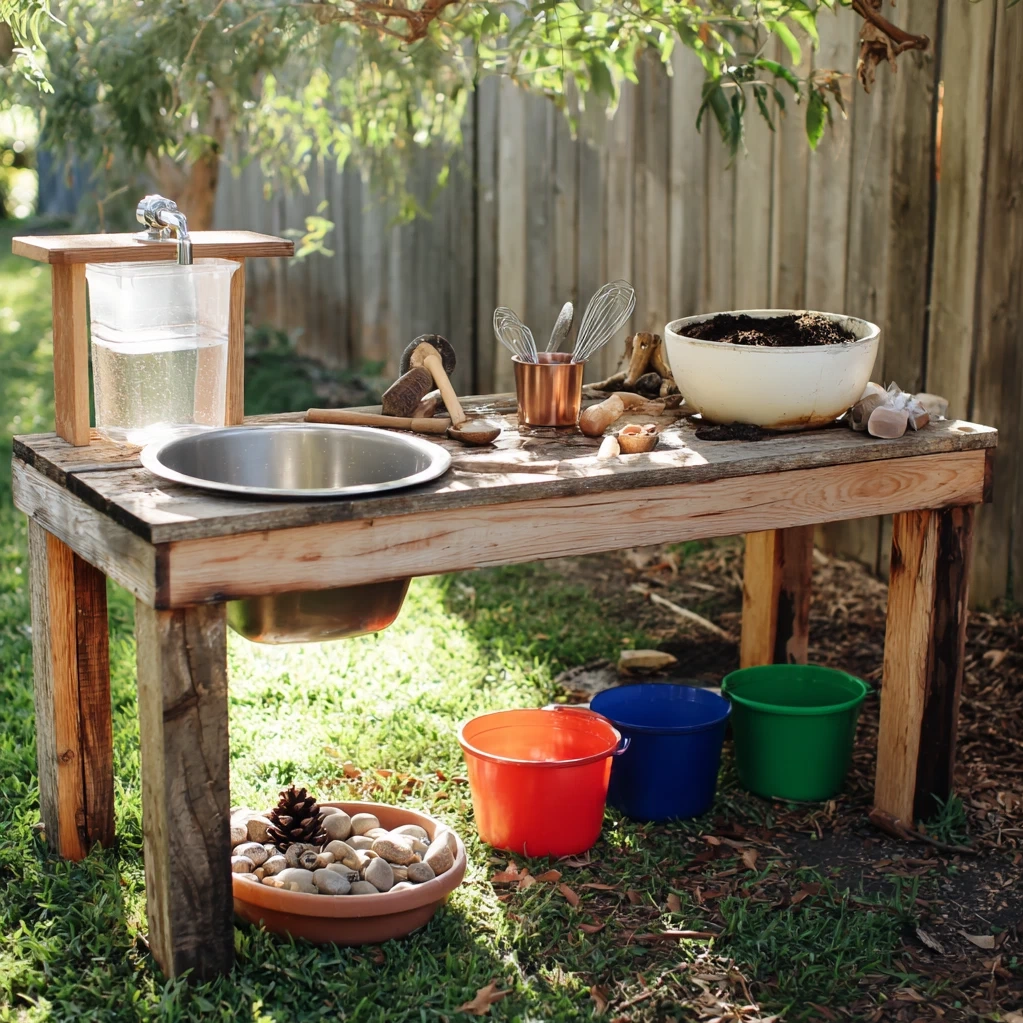
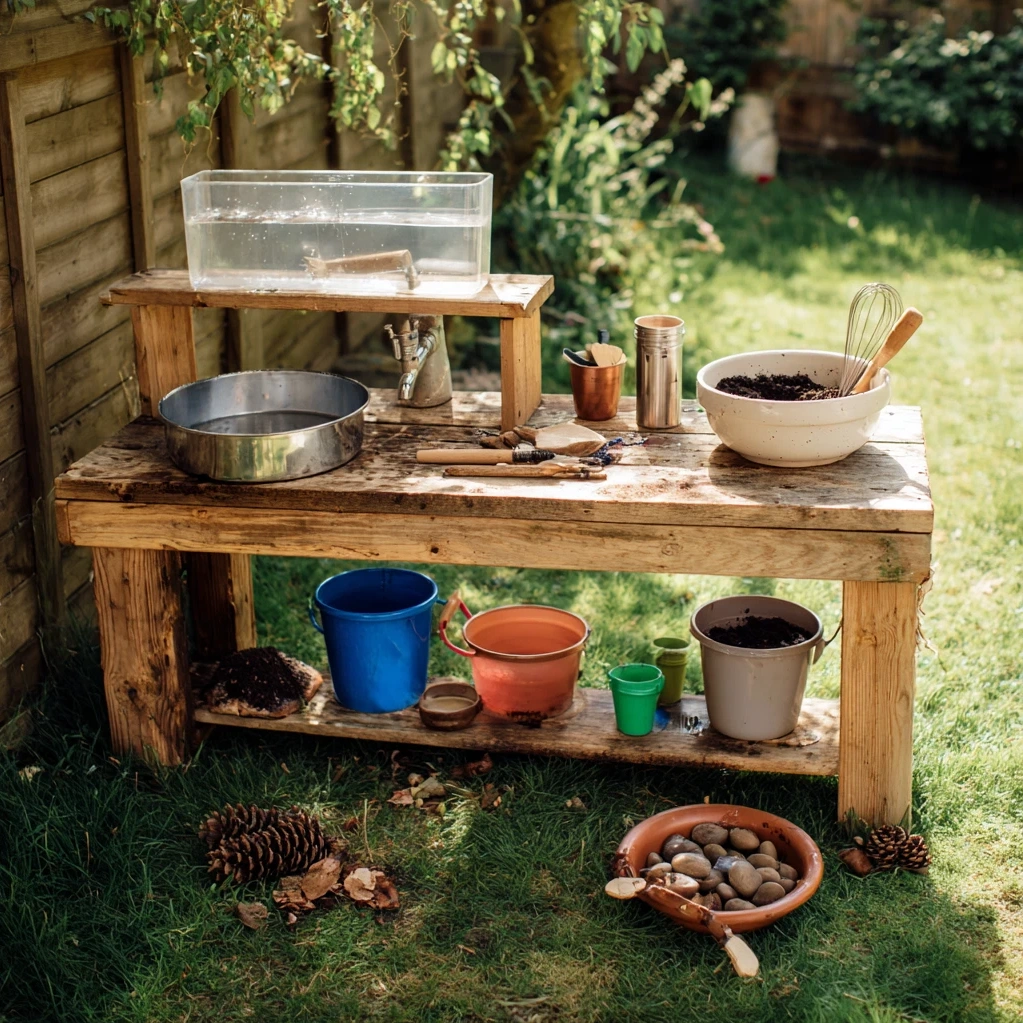
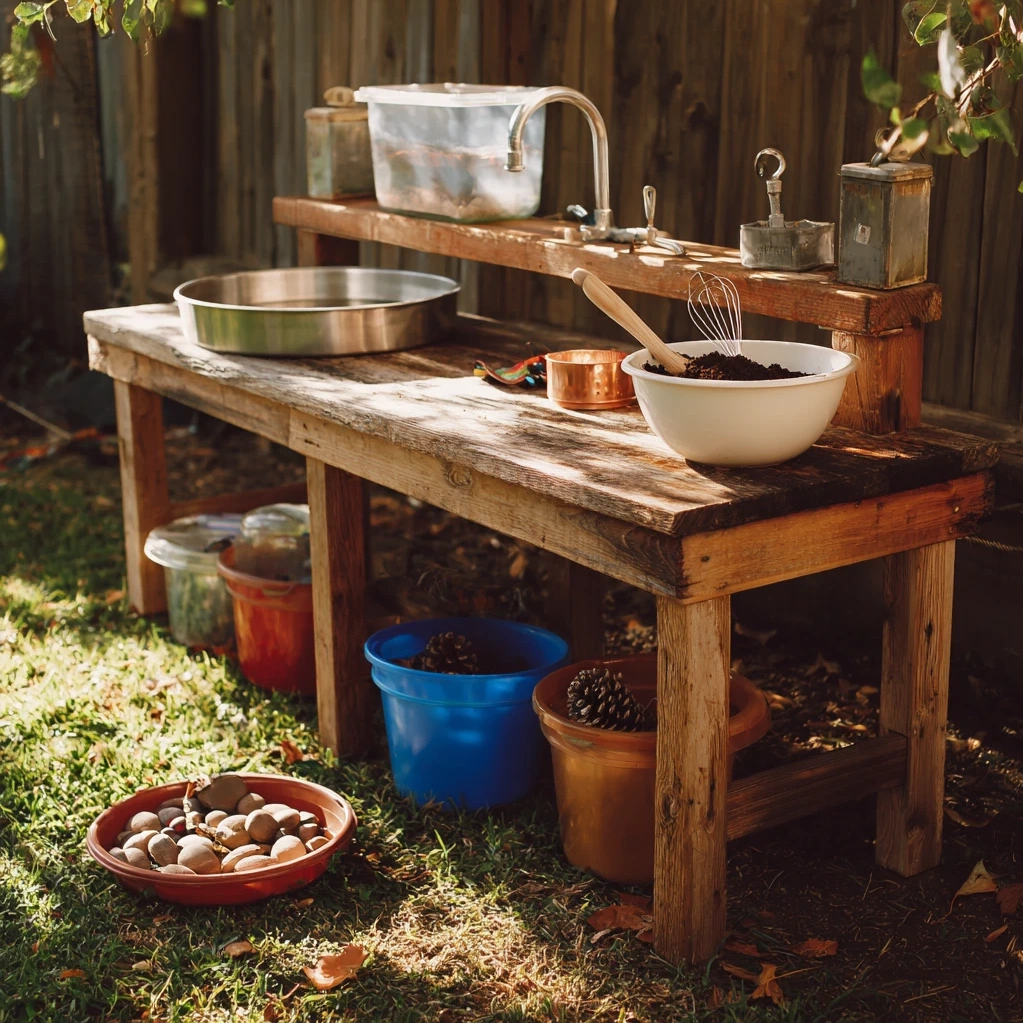
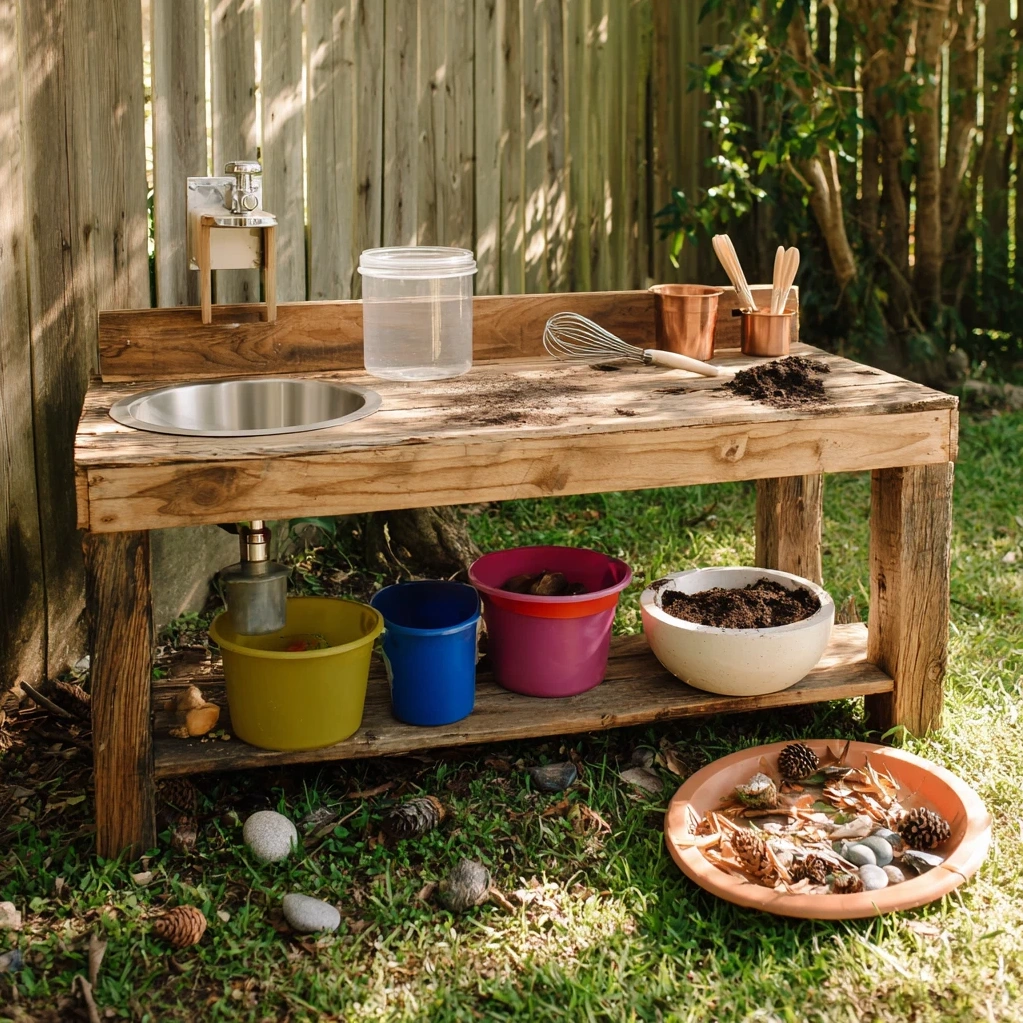
Before you begin building your DIY mud kitchen, gathering the right materials is crucial for creating a functional and durable playspace. The beauty of this project lies in its flexibility—you can use repurposed items, thrift store finds, and natural materials to keep costs low while adding character. Start with the basic structure: an old table, workbench, or sturdy shelving unit forms the foundation. Look for weather-resistant wood like cedar or pressure-treated lumber if building from scratch, or repurpose an outdoor table that can withstand the elements. For the kitchen elements, collect old pots, pans, bowls, and utensils from thrift stores or your own kitchen donations. Metal items work best as they're durable and create satisfying sounds when used for mixing and pouring.
Water is essential for any DIY mud kitchen, so consider adding a simple water source. This could be as basic as a large bucket with a spigot attached, a repurposed garden watering can, or even a small hand-pump system connected to a water container. For storage and organization, incorporate shelves, hooks, and containers for keeping tools and ingredients accessible. Natural materials like smooth stones, pine cones, leaves, and flowers make perfect 'ingredients' for creative play. Don't forget safety considerations: ensure all materials are non-toxic, sand down any rough edges on wood, and avoid using broken or sharp items. With these materials gathered, you're ready to design a DIY mud kitchen that will inspire hours of creative outdoor play while teaching valuable lessons about resourcefulness and sustainability.
Step-by-Step Construction of Your DIY Mud Kitchen
Building your DIY mud kitchen involves straightforward steps that even beginners can follow with satisfying results. Begin by preparing your workspace and gathering tools: you'll need basic woodworking tools like a saw, drill, screws, sandpaper, and protective gear. If using a repurposed table or bench, clean it thoroughly and make any necessary repairs. For a custom-built structure, start with a simple frame using 2×4 lumber—aim for a height appropriate for your child's age, typically between 24 to 36 inches. Add a sturdy work surface using exterior-grade plywood or reclaimed wood, ensuring it's securely attached and sanded smooth.
Next, incorporate functional elements that make your DIY mud kitchen engaging. Install shelves at child-friendly heights using brackets or built-in supports. Add hooks along the sides or back for hanging utensils and tools. Create a 'sink' area by cutting a hole in the work surface and securing a large plastic bowl or basin beneath—this catches water and mud during play. For the water source, attach a simple spigot to a large food-grade container or install a hand-pump system. Consider adding a backsplash using reclaimed wood or outdoor-rated board to contain splashes and add visual appeal.
Finish your DIY mud kitchen with thoughtful details that enhance play value. Paint or stain the wood using non-toxic, outdoor-safe products in colors that complement your backyard. Add chalkboard paint to one section for recipe writing or artistic expression. Organize tools and materials in accessible containers—mason jars for small items, buckets for larger supplies. Create designated areas for 'ingredients' using divided trays or shallow boxes. Finally, position your completed DIY mud kitchen in a suitable location: choose a level spot with good drainage, partial shade if possible, and proximity to natural materials like soil, sand, and plants. With these steps complete, you'll have created a durable, engaging playspace that encourages endless creative exploration.
Creative Ideas to Enhance Your DIY Mud Kitchen
Once your basic DIY mud kitchen is constructed, adding creative enhancements can transform it from a simple playspace into an immersive outdoor learning environment. Start with sensory elements that engage different senses: incorporate various textures by including smooth river stones, coarse sand, silky leaves, and squishy mud mixtures. Add aromatic herbs like mint, lavender, or rosemary in nearby planters—children can harvest these for their 'recipes,' engaging their sense of smell while learning about plants. Consider creating a dedicated mud mixing station with different soil types and natural additives like cornstarch or oatmeal for varied consistencies.
Expand the play possibilities by incorporating themed elements that spark imagination. Create a 'bakery corner' with muffin tins, rolling pins, and cookie cutters for mud pies and nature cookies. Add a 'herb garden' section with labeled pots of easy-to-grow plants children can tend. Include measuring tools like cups, spoons, and scales to introduce basic math concepts through play. For older children, incorporate more complex elements like a pulley system for lifting buckets or a simple water filtration setup using sand and gravel.
Don't forget the importance of storage and organization in your DIY mud kitchen. Designate specific areas for different types of materials: one shelf for pots and pans, another for utensils, containers for natural ingredients, and hooks for aprons and tools. Use clear, labeled containers so children can easily find what they need and learn organizational skills. Consider adding a weatherproof box or bin for storing special items when not in use. Finally, involve children in the enhancement process—let them choose colors, arrange tools, and suggest additions. This ownership makes the DIY mud kitchen truly theirs and increases engagement. With these creative ideas, your mud kitchen becomes more than just a play structure; it becomes a dynamic outdoor classroom that grows with your child's imagination and development.
Conclusion
Creating a DIY mud kitchen represents more than just a weekend project—it's an investment in childhood creativity, outdoor exploration, and family connection. Throughout this guide, we've explored how this simple structure can transform your backyard into a hub of imaginative play that benefits children's development in numerous ways. From gathering repurposed materials to constructing a durable playspace and adding creative enhancements, each step builds toward creating an environment where learning happens naturally through hands-on experience.
The lasting value of a DIY mud kitchen extends beyond the immediate play sessions. Children develop problem-solving skills as they figure out how to mix the perfect mud consistency, social skills as they negotiate roles in their imaginary restaurant or bakery, and scientific understanding as they observe how water interacts with different materials. Parents gain peace of mind knowing their children are engaged in screen-free, developmentally appropriate play that encourages physical activity and connection with nature.
Looking forward, your DIY mud kitchen can evolve with your family's needs. As children grow, you can modify the structure—adding more complex elements, expanding the workspace, or incorporating gardening components. The basic principles remain the same: providing a space for unstructured, sensory-rich play that sparks creativity. Start simple, involve your children in the process, and watch as this humble project becomes the centerpiece of your outdoor living space. The mud may wash off, but the memories and skills developed through this creative play will last a lifetime, making your DIY mud kitchen one of the most rewarding projects you'll ever undertake for your family's backyard enjoyment.
Frequently Asked Questions
Q: What age is appropriate for a DIY mud kitchen?
DIY mud kitchens are suitable for children as young as 18 months up to around 10 years old, with modifications for different age groups. Toddlers benefit from simple sensory exploration with close supervision, using larger tools and containers. Preschoolers (ages 3-5) engage in more imaginative play and can handle basic pouring and mixing activities. School-age children (6-10) enjoy more complex elements like recipe creation, measurement activities, and incorporating gardening components. Always supervise younger children, ensure all materials are age-appropriate and safe, and adjust the kitchen's height and complexity as children grow. The versatility of a DIY mud kitchen allows it to evolve with your child's development.
Q: How do I maintain and clean a DIY mud kitchen?
Proper maintenance ensures your DIY mud kitchen remains safe and functional for years. After each use, encourage children to rinse tools and containers with water—this simple habit prevents hardened mud buildup. Empty water containers to prevent stagnation and mosquito breeding. Periodically, give the entire structure a thorough cleaning using mild soap and water, scrubbing surfaces with a brush if needed. Check wooden components for signs of wear, reapplying protective sealant annually if using untreated wood. Store fabric items like aprons indoors when not in use. During winter or extended non-use, cover the kitchen with a waterproof tarp or move it to a sheltered area. Regular maintenance takes minimal effort but significantly extends your DIY mud kitchen's lifespan while keeping it hygienic for play.
Q: Can I build a DIY mud kitchen if I have limited space or budget?
Absolutely! DIY mud kitchens can be adapted to any space or budget with creative solutions. For small spaces, create a compact version using a repurposed nightstand, small table, or even a wooden crate mounted to a fence. Focus on vertical storage with hooks and shelves to maximize limited area. For tight budgets, source materials from thrift stores, garage sales, or your own home—old baking sheets become work surfaces, mismatched bowls serve as containers, and fallen branches make perfect natural utensils. The simplest DIY mud kitchen might consist of just a sturdy surface, a few containers, and access to soil and water. Remember, the value comes from the play experience, not the cost or size. Start with basics and add elements over time as resources allow.