
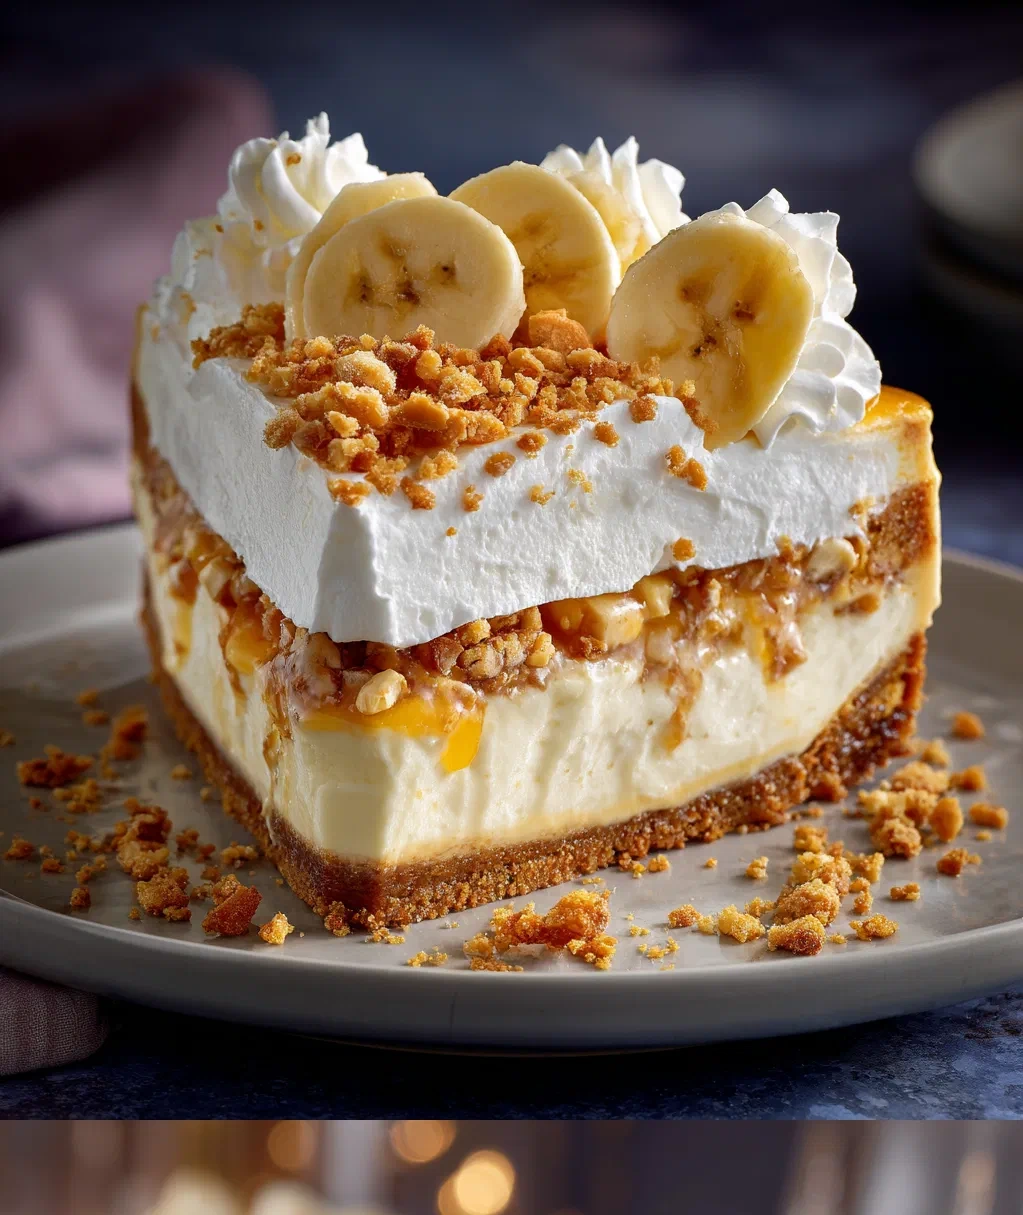
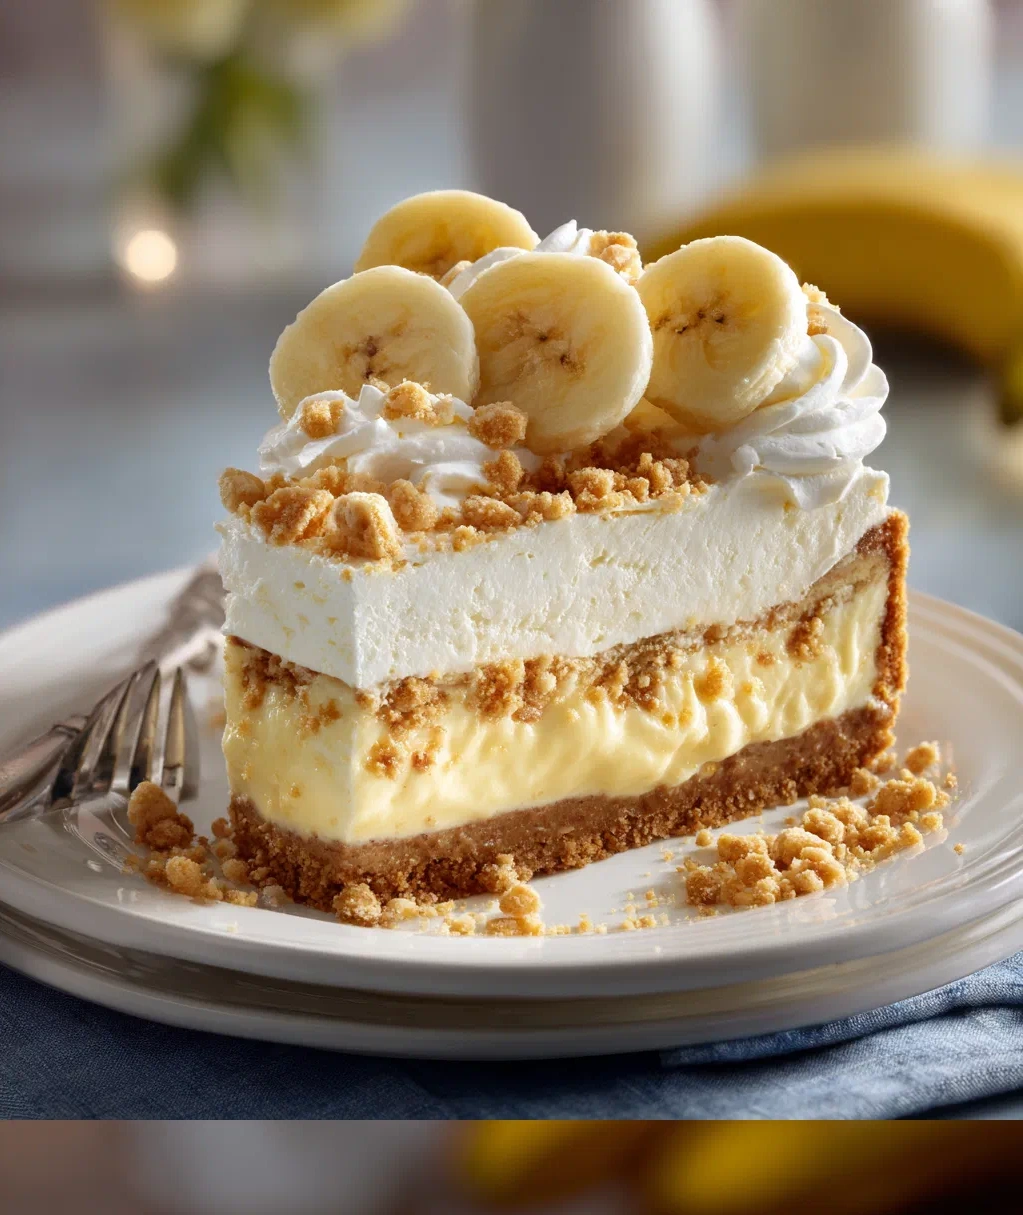
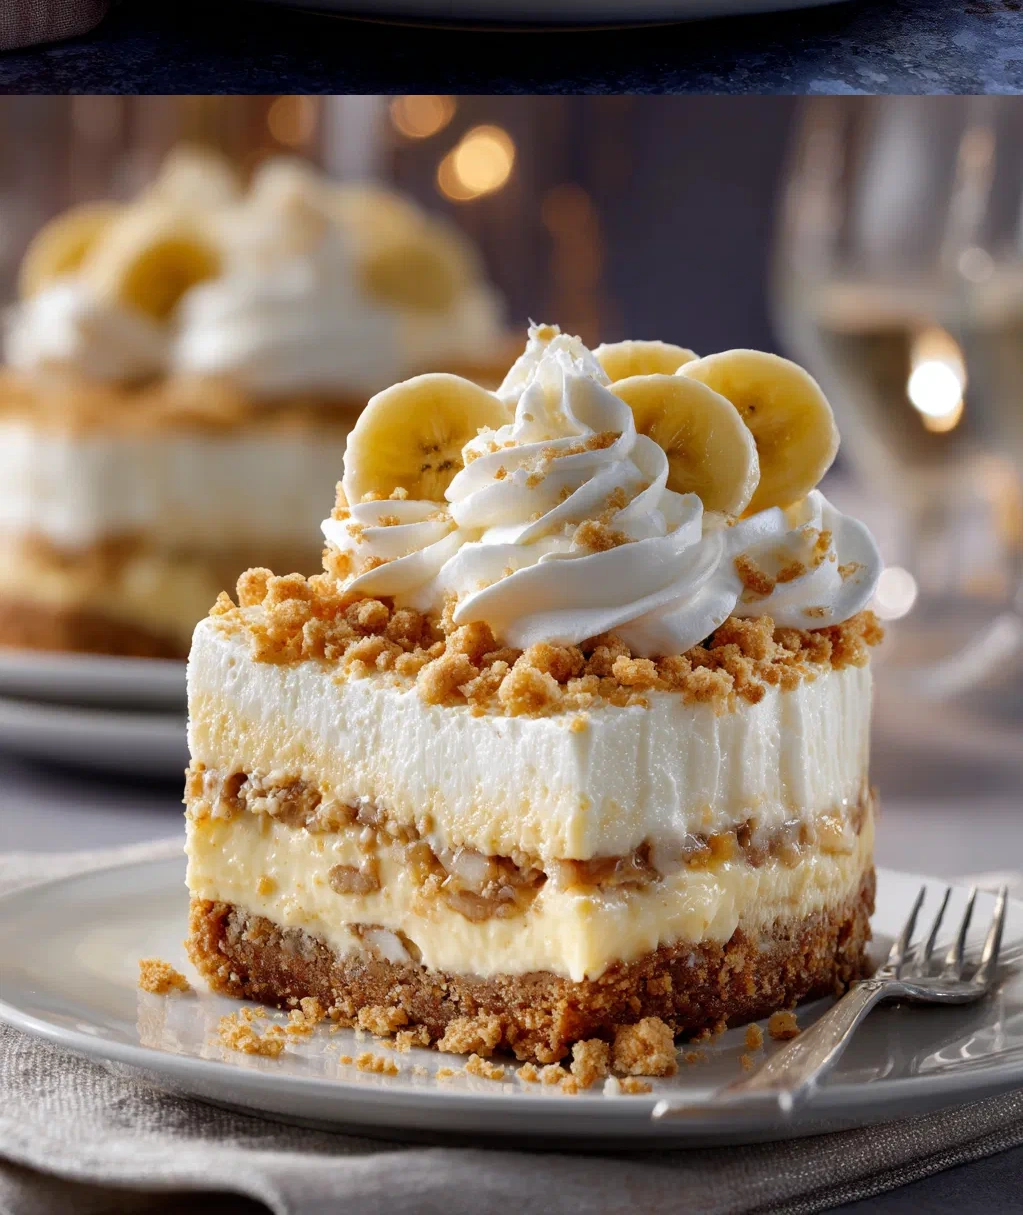
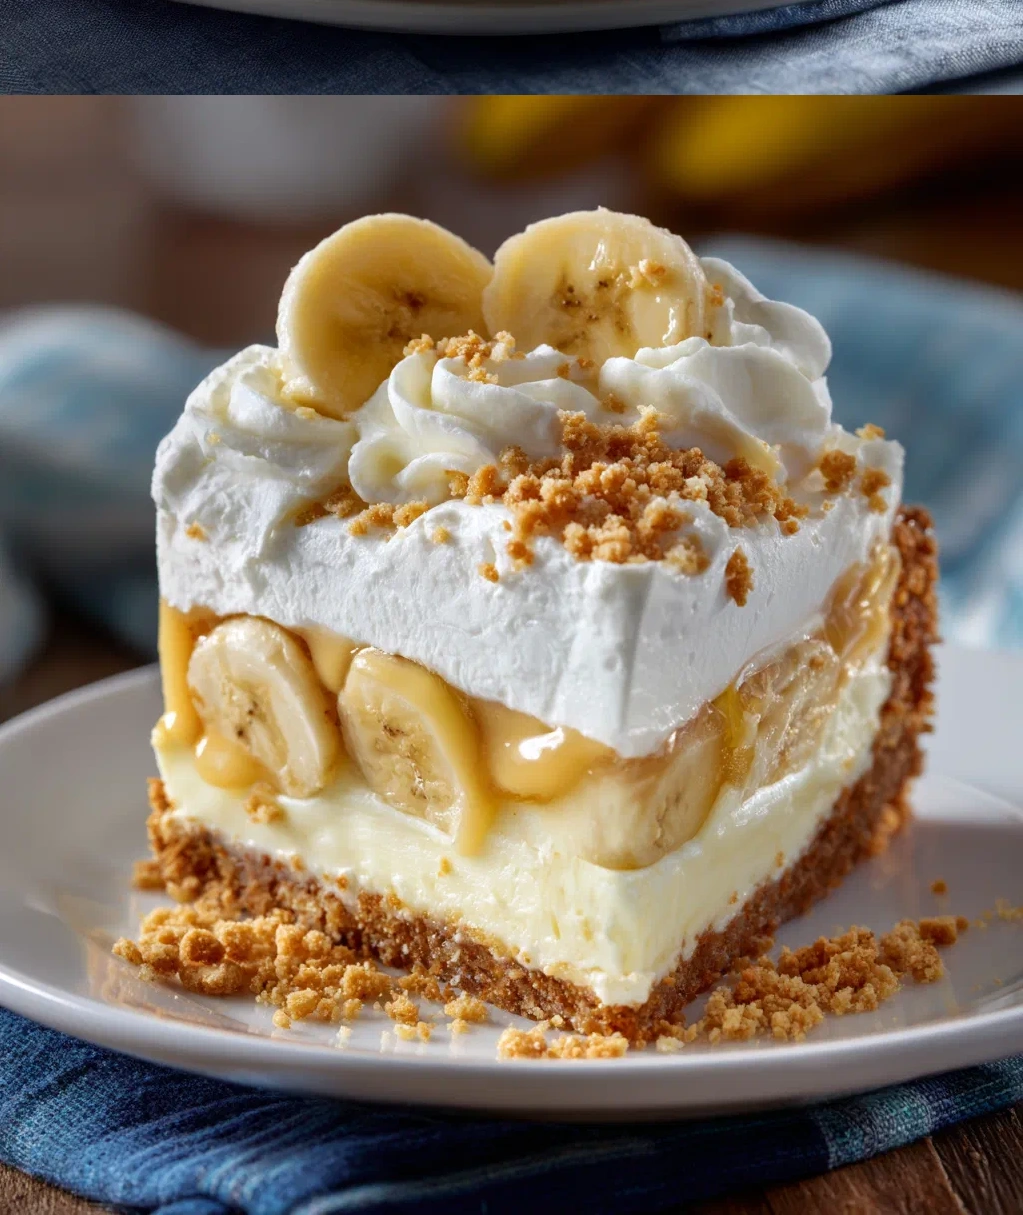
Banana Pudding Crunch Cheesecake: Irresistible Creamy Delight You’ll Absolutely Love
Hey there! If you’re like me, you’re always on the lookout for that perfect dessert that combines familiar comfort with a little something special. Well, let me tell you about my latest obsession: this incredible banana pudding crunch cheesecake. I’ve been tinkering with this recipe for months now, and I’m so excited to share it with you. It all started when I was craving both banana pudding and cheesecake one lazy Sunday afternoon – why choose when you can have both, right?
This banana pudding crunch cheesecake brings together everything we love about classic banana pudding with the rich, creamy texture of cheesecake, plus this amazing crunchy layer that adds the perfect contrast. It’s the kind of dessert that makes people’s eyes light up when you bring it to the table. The first time I made it for a family gathering, my cousin actually asked for the recipe before she’d even finished her slice! That’s when I knew I had to share it properly.
What I love most is how it feels both fancy and familiar at the same time. You get that nostalgic banana pudding flavor we all grew up with, but in this beautiful, impressive cheesecake form. And that crunch layer? Trust me, it’s the game-changer. So grab your mixing bowls and let’s make some magic happen!
Why This Banana Pudding Crunch Cheesecake Will Become Your Go-To Dessert
Let me tell you why this banana pudding crunch cheesecake has earned a permanent spot in my recipe rotation. First off, it solves that age-old problem: what to bring to parties or family dinners that will please everyone. This dessert has universal appeal – kids love the banana pudding flavors, adults appreciate the sophisticated cheesecake texture, and everyone goes crazy for that crunchy layer.
Here’s what makes it so special:
- Perfect texture combination: You get creamy, crunchy, and soft all in one bite. That contrast is what makes it so addictive!
- Make-ahead friendly: You can prepare this banana pudding crunch cheesecake a day or two in advance. In fact, it tastes even better after chilling overnight.
- Customizable: Don’t like nuts? Skip ’em. Want more banana flavor? Add extra banana slices between layers. It’s really forgiving.
- Impressive but approachable: It looks like you spent hours in the kitchen (and you kind of do), but the steps are actually quite simple.
- Great for all seasons: It’s light enough for summer but comforting enough for winter. I’ve made it for Fourth of July picnics and Christmas dinners with equal success.
My favorite part is watching people’s reactions when they take that first bite. There’s always that moment of surprise when they hit the crunchy layer, followed by that happy sigh. It’s just one of those desserts that makes people feel good.
Everything You'll Need for Your Banana Pudding Crunch Cheesecake
Gathering your ingredients is the first step to making this amazing banana pudding crunch cheesecake. I recommend getting everything out and measured before you start – it makes the whole process so much smoother. Don’t worry if you need to make substitutions; I’ll mention alternatives as we go.
For the crust:
- 2 cups graham cracker crumbs (about 15 full sheets)
- 1/2 cup melted unsalted butter
- 1/4 cup granulated sugar
- Pinch of salt
For the cheesecake filling:
- 24 oz (three 8-oz packages) cream cheese, softened to room temperature
- 1 cup granulated sugar
- 3 large eggs, room temperature
- 1 cup mashed very ripe bananas (about 2-3 medium bananas)
- 1 teaspoon vanilla extract
- 1/2 cup sour cream
- 2 tablespoons all-purpose flour
For the banana pudding layer:
- 1 (3.4 oz) package instant banana pudding mix
- 1 1/2 cups cold whole milk
- 1 cup whipped topping (like Cool Whip), thawed
- 1-2 fresh bananas, sliced (for topping)
For the crunch layer (the star!):
- 1 cup crushed vanilla wafers
- 1/2 cup chopped pecans or walnuts (optional but recommended)
- 1/4 cup packed brown sugar
- 3 tablespoons melted butter
A quick note: make sure your cream cheese is truly softened. I leave mine out for a couple hours before starting. If it’s still cold, you’ll get lumps in your filling, and nobody wants that!
Step-by-Step Guide to Making Banana Pudding Crunch Cheesecake
Ready to make this showstopping banana pudding crunch cheesecake? Let’s walk through it together. I’ve made this so many times I could probably do it in my sleep, but I’ll share all my little tips along the way.
Step 1: Prepare your pan and oven
First, preheat your oven to 325°F (163°C). Grab a 9-inch springform pan – the kind with the removable sides. Line the bottom with parchment paper (it makes removal so much easier) and lightly grease the sides. Wrap the outside bottom and sides with aluminum foil. This creates a water bath barrier to prevent leaks.
Step 2: Make the crust
In a medium bowl, mix the graham cracker crumbs, melted butter, sugar, and salt until it resembles wet sand. Press this firmly into the bottom of your prepared pan. I like to use the bottom of a measuring cup to get it really packed down. Bake for 10 minutes, then let it cool while you make the filling.
Step 3: Create the cheesecake filling
In a large bowl, beat the softened cream cheese until it’s smooth and creamy – about 2-3 minutes with a mixer. Add the sugar and beat until combined. Add eggs one at a time, beating after each addition. Now mix in the mashed bananas, vanilla, sour cream, and flour until everything is just combined. Don’t overmix here!
Step 4: Bake with a water bath
Pour the filling over your cooled crust. Place the springform pan inside a larger baking dish. Pour hot water into the larger dish until it comes about halfway up the sides of the springform pan. This water bath is crucial – it prevents cracks and ensures even cooking. Bake for 50-60 minutes until the edges are set but the center still jiggles slightly.
Step 5: Cool completely
Turn off the oven, crack the door open, and let the cheesecake cool in the oven for 1 hour. Then remove it from the water bath and let it cool completely at room temperature. Once cool, refrigerate for at least 4 hours, but overnight is best.
Step 6: Add the layers
When your cheesecake is chilled, make the banana pudding by whisking the pudding mix with cold milk for 2 minutes. Let it set for 5 minutes, then fold in the whipped topping. Spread this over the chilled cheesecake. Arrange banana slices on top.
Step 7: Create the crunch topping
Mix the crushed vanilla wafers, chopped nuts (if using), brown sugar, and melted butter. Sprinkle this evenly over the banana layer. Return to the refrigerator for at least 30 minutes before serving.
See? Not so complicated! The key is taking your time with each step and not rushing the cooling process.
Serving and Storing Your Banana Pudding Crunch Cheesecake
Now for the best part: enjoying your banana pudding crunch cheesecake! But first, let’s talk about how to serve it properly and keep any leftovers (if you’re lucky enough to have any).
Serving tips:
When you’re ready to serve, run a thin knife under hot water, dry it, and run it around the edge of the springform pan before releasing the sides. This gives you clean edges. Use a sharp knife to cut slices, wiping it clean between cuts for pretty pieces.
I like to serve this banana pudding crunch cheesecake slightly chilled but not ice-cold. Take it out of the refrigerator about 15-20 minutes before serving. This lets the flavors really shine through. If you want to get fancy, you can add a dollop of fresh whipped cream on top of each slice, or drizzle with caramel sauce. But honestly, it’s perfect just as it is!
Storage instructions:
Cover any leftover banana pudding crunch cheesecake tightly with plastic wrap or transfer to an airtight container. It will keep in the refrigerator for 3-4 days. The banana slices on top might brown a bit – that’s normal and doesn’t affect the taste. If you want to prevent browning, you can toss the banana slices in a little lemon juice before arranging them, but I don’t usually bother.
You can also freeze this cheesecake for up to 2 months. Wrap individual slices or the whole thing tightly in plastic wrap, then aluminum foil. Thaw in the refrigerator overnight before serving. The texture might change slightly after freezing, but it’s still delicious.
One important safety note: because this contains dairy and fresh fruit, don’t leave it out at room temperature for more than 2 hours. I usually put any leftovers right back in the fridge after serving.
This banana pudding crunch cheesecake actually tastes even better the next day as the flavors have more time to meld together. So if you can resist eating it right away, it’s worth the wait!
Easy Variations for Your Banana Pudding Crunch Cheesecake
One of the things I love most about this banana pudding crunch cheesecake recipe is how adaptable it is. Once you’ve mastered the basic version, feel free to get creative! Here are some of my favorite variations that I’ve tried over the years.
Different crust options:
- Vanilla wafer crust: Use crushed vanilla wafers instead of graham crackers for an even more banana-forward flavor.
- Chocolate crust: Add 2 tablespoons of cocoa powder to the graham cracker mixture for a chocolate twist.
- Ginger snap crust: Crushed ginger snaps add a lovely warm spice that pairs beautifully with banana.
Filling variations:
- Chocolate chip addition: Fold 1/2 cup of mini chocolate chips into the cheesecake batter before baking.
- Caramel swirl Before baking, drizzle 1/4 cup of caramel sauce over the filling and swirl it gently with a knife.
- Nutty version: Add 1/2 cup of finely chopped toasted pecans to the cheesecake filling.
Topping ideas:
- Different crunch: Instead of vanilla wafers, try using crushed peanut butter cookies or shortbread cookies in your crunch layer.
- No nuts: Simply omit the nuts from the crunch layer if you have allergies or preferences.
- Extra banana: Add another layer of sliced bananas between the cheesecake and pudding layers.
Mini versions:
You can make individual banana pudding crunch cheesecakes in a muffin tin! Use cupcake liners, press the crust into the bottom of each, add filling, and bake for 20-25 minutes. They’re perfect for parties or when you want portion control (though let’s be real – you’ll probably eat two!).
The beauty of this banana pudding crunch cheesecake is that it’s really hard to mess up. As long as you follow the basic structure, you can play around with the details to make it your own. My neighbor adds a layer of dulce de leche between the cheesecake and pudding, and it’s absolutely divine!
Conclusion
Well, there you have it – my absolute favorite banana pudding crunch cheesecake recipe in all its glory. From that first buttery crust bite to the last bit of crunchy topping, every layer brings something special to the table. What started as a kitchen experiment has become my most-requested dessert, and I hope it becomes one of yours too.
The thing I love most about this recipe isn’t just how delicious it is (though that’s definitely a big part of it). It’s how it brings people together. I’ve made this for birthdays, holidays, potlucks, and just because-Tuesdays. Every time, it sparks conversations, brings back memories of childhood banana pudding, and creates new happy moments around the table.
So next time you’re looking for a dessert that’s sure to impress but still feels like home, give this banana pudding crunch cheesecake a try. Take your time with each step, don’t skip the water bath, and most importantly – have fun with it! Cooking should be joyful, and this recipe definitely brings me joy every single time I make it. I can’t wait to hear how yours turns out!
Frequently Asked Questions
Q: Can I make this banana pudding crunch cheesecake ahead of time?
Absolutely! In fact, I recommend it. This cheesecake needs to chill for at least 4 hours after baking, but overnight is even better. The flavors develop and meld together beautifully when it has time to rest. You can make the entire dessert 1-2 days before you plan to serve it. Just keep it covered in the refrigerator until you're ready to add the final crunch topping (add that within a few hours of serving for maximum crunch).
Q: My bananas aren't very ripe. Can I still make the cheesecake?
For the best flavor, you really want very ripe bananas – the kind with lots of brown spots. They're sweeter and have a stronger banana flavor. If your bananas aren't ripe enough, you can speed up the process by baking them (unpeeled) on a baking sheet at 300°F for 15-20 minutes until the skins turn black. Let them cool, then use the soft insides. Alternatively, you can add 1/2 teaspoon of banana extract to boost the flavor, but fresh ripe bananas are always best.
Q: How do I prevent the cheesecake from cracking?
The water bath is your best friend here! It creates a steamy environment that cooks the cheesecake gently and evenly. Also, make sure not to overmix the batter once you add the eggs, and don't open the oven door during baking. After baking, let it cool slowly in the turned-off oven with the door cracked open. Even if it does crack a little, don't worry – the pudding and crunch layers will cover it up beautifully!
Q: Can I use homemade pudding instead of instant mix?
You can, but I find instant pudding works best for this recipe because it sets up quickly and holds its structure well on top of the cheesecake. If you prefer homemade, make a cooked pudding that's quite thick, then chill it completely before folding in the whipped topping. The texture might be slightly different, but it will still taste delicious. Just make sure it's cool before spreading it on your chilled cheesecake.
Q: How long will leftovers keep in the refrigerator?
Your banana pudding crunch cheesecake will keep well in the refrigerator for 3-4 days when properly covered. The banana slices on top might brown a bit over time, but that's just cosmetic and doesn't affect the taste. For the best texture, I recommend eating it within 2-3 days. If you need to store it longer, you can freeze individual slices for up to 2 months – just thaw in the refrigerator overnight before serving.
PrintBanana Pudding Crunch Cheesecake
- Total Time: 75
- Yield: 12 servings 1x
Description
A creamy cheesecake with layers of banana pudding and vanilla wafers, topped with a crunchy graham cracker streusel.
Ingredients
For the crust:
1 1/2 cups graham cracker crumbs
1/4 cup granulated sugar
6 tablespoons unsalted butter, melted
For the filling:
24 ounces cream cheese, softened
1 cup granulated sugar
3 large eggs
1 cup mashed ripe bananas (about 2 medium bananas)
1 teaspoon vanilla extract
1/2 cup sour cream
For the pudding layer:
1 (3.4 ounce) package instant banana pudding mix
1 1/2 cups cold milk
For the crunch topping:
1 cup crushed vanilla wafers
1/4 cup chopped pecans
2 tablespoons brown sugar
2 tablespoons unsalted butter, melted
Instructions
Step 1: Preheat oven to 325°F (163°C).
Step 2: In a medium bowl, mix graham cracker crumbs, 1/4 cup sugar, and 6 tablespoons melted butter until combined.
Step 3: Press mixture firmly into bottom of a 9-inch springform pan.
Step 4: Bake crust for 10 minutes, then remove and let cool.
Step 5: In a large bowl, beat cream cheese and 1 cup sugar until smooth.
Step 6: Add eggs one at a time, beating after each addition.
Step 7: Mix in mashed bananas, vanilla extract, and sour cream until well combined.
Step 8: Pour filling over cooled crust.
Step 9: Bake for 45-50 minutes until center is set but still slightly jiggly.
Step 10: Turn off oven, leave cheesecake in oven with door slightly open for 1 hour.
Step 11: Remove from oven and cool completely at room temperature.
Step 12: In a medium bowl, whisk pudding mix with cold milk until thickened.
Step 13: Spread pudding evenly over cooled cheesecake.
Step 14: In a small bowl, combine crushed vanilla wafers, pecans, brown sugar, and 2 tablespoons melted butter.
Step 15: Sprinkle crunch topping over pudding layer.
Step 16: Refrigerate cheesecake for at least 4 hours before serving.
- Prep Time: 25
- Cook Time: 50
- Category: Dessert
Nutrition
- Calories: 480
- Fat: 32g
- Carbohydrates: 42g
- Protein: 8g